
How to Make a Fishtail Pow Board with Launch Team Rider Josh Boise
Team rider Josh Boise rides hard and his boards take a beating. So when we asked him what he does with his older decks, he told us he upcycles them. The ones that still have some life get repurposed as fishtail pow boards. Check out his step-by-step instructions on how he converts his boards in fishtails for a fun weekend DIY project!
Supplies: Old/broken snowboard, permanent marker, ruler/straight edge, power saw, sand paper, wire cutters, p-tex equipment, wax equipment
Step 1 - You’re going to want to find an old snowboard or a snowboard with a broken tail/nose. If the tail or nose is broken, make sure it is at least six inches from the screw inserts.
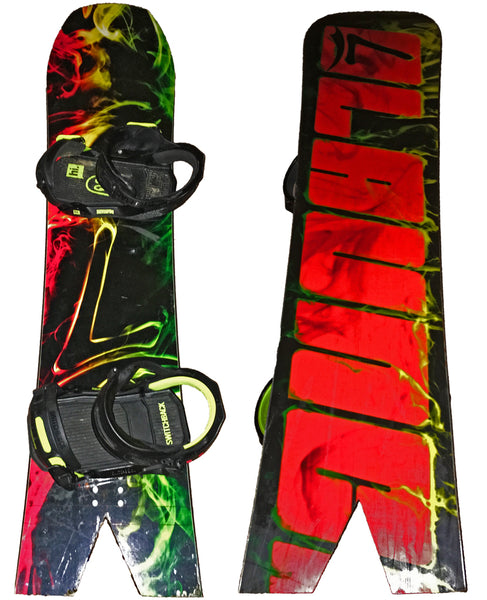
Step 2 - To start off the fish tail shape, you should measure a line that is horizontal and six inches away from the screw inserts. This will ensure that there will still be enough room for your bindings. Measure the width of your board and make a mark on the line that is directly in the middle. Then you are going to want to measure the width of the board at the length you desire the fishtail to be. Mark a line at your desired length for the fish tail. Once you measure the width of the board(at the end of the fish tail), divide that number by three. Divide the end of the fishtail into three equal parts and mark them. Connect those two points at the end of the fish tail to the middle point of the line that is six inches away from your screw inserts.
Step 3 - It will be easier to cut the edges if you have cut the board first. Take your power saw and cut through the lines of your fishtail drawing. If your saw can’t make it through the metal edges, take your wire cutters and cut the edges.
Step 4 - Take your sandpaper and sand down the exposed wooden edges of your board until smooth.
Step 5 - Light the p-tex and drip it on the exposed wooden edge to ensure there won’t be any water damage to your core. Be careful to not drip too much at a time or the board may catch fire. After the p-tex is dried, drip wax over your base to cover up any scratches caused from making the board. After the wax is dried, remove any excess p-tex and wax.
Step 6 - Mount bindings and go shred!

Comments
hlhucxcpdg said:
Muchas gracias. ?Como puedo iniciar sesion?